Almost everyone has to fight belly fat at some point in life. Having a nice, toned flat belly can take quite some time and effort even with balanced diet and regular physical activity. But, do not get disappointed because these easy yoga positions can do miracles for your body core.

The thing is that yoga has been practiced for more than 5 thousand years, so this tells us it must be efficient. Yoga is described by many as a workout of the whole body that is good not only in toning and strengthening the muscles but also at relaxation and calming the mind. There are more than hundred types of yoga, simple and complex. This makes it possible for anyone to include yoga in the daily routine.
These ten easy yoga poses can help in getting rid of abdominal fat.
-
Board (Kumbhakasana)
This position is evidently for the whole body. The move focuses on the thighs, shoulders, back, buttocks and of course – the belly area.
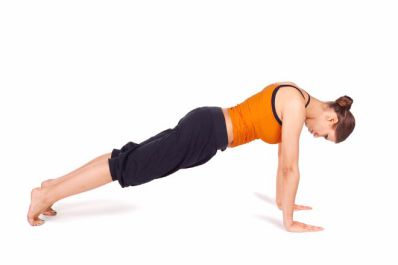
Directions:
Stand in a position similar to the one for starting push-ups, with your arms straight under your knees and place the hands directly under the shoulders and arms. Look at your hands and breathe in, making sure you keep your spine and back straight. Keep the hands flat, and spread the fingers as you pull on the abdominal muscles. Stay in this pose for 15-30 seconds, before you get on your knees. Repeat it for 4 times, with a break of 15 seconds in between.
-
Pontoon Posture (Naukasana)
This pose works on the back and leg muscles which ultimately helps in reducing the accumulated fat in the waist.
Directions:
Lie on your back and stretch out your legs and arms down on the sides. Breathe in as you lift your legs up, while at the same time stretching your toes and feet. Keep your legs straight. After that, form a 45-degre angle with your body by trying to reach your extended legs with your arms. Hold the posture for 15 seconds and try to breathe normally. Then rest for about 15 seconds. Repeat the posture for 5 times, resting between repetitions.
-
Wind Easing Posture (Pavanamukthasan)
This posture is really good for relief for those that have back pain. It strengthens the core the hips and the thighs. It is also good at maintaining healthy pH levels and metabolism improvement.
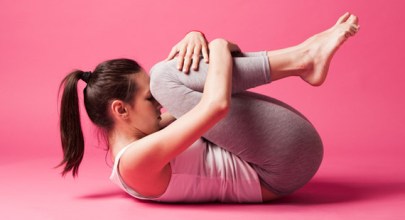
Directions:
First lie on your back and stretch out the legs with the heels touching and keep the arms on your side. Then, exhale as you bend the knees, moving them to your chest. Hold the knees and pull them closer to the body. Keep the thighs tight and apply pressure to the abdominal muscles during the posture. Stay in the position for a minute\minute and a half, breathing deeply and deliberately. Exhale and release the knees, letting your arms rest on your side. Do 5 repetitions with a 15 seconds break.
-
Bow Posture (Dhanurasana)
This posture is ideal for core strength and tightness of the muscles in the abdominal area. It includes stretch of the whole body that increases the energy levels and stimulates good digestion.
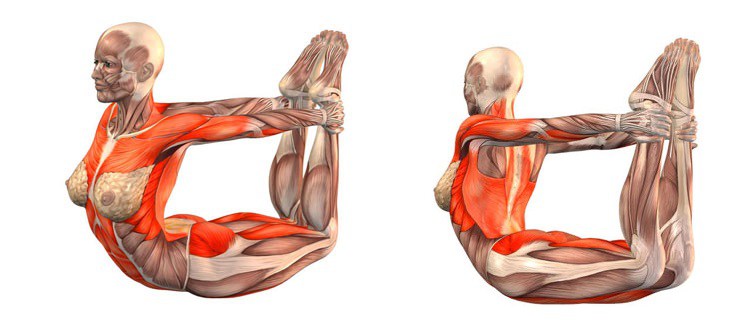
Directions:
Li with the stomach on the mat and stretch out the legs and the arms to the side. Then bend the knees upwards while reaching with the arms to hold the feet. Stay in this pose for 15-30 second, breathing normally. Breathe out and go back to the first position for 15 seconds. Repeat 5 times with breaks.
-
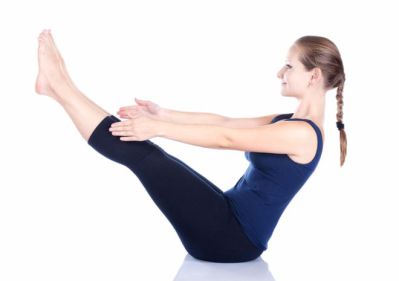
Boat (Naukasana)
This pose is similar to pose #4 and it offers a belly workout, but also helps the back, legs and arms.

Directions:
Lye on your back and stretch the legs and arms. Inhale as you raise your chest and feet. Keep your gaze straight to align your body. Stay in this pose as you breathe in and out ten times. Do 5 repetitions and 15 second breaks.
-
Cobra Posture (Bhujang asana)
This pose strengthens the upper body and the spine and is a multi-muscle workout. It is not recommended for hernia patients, patients with back injury or pregnant women.

Directions:
Lay with the stomach down and stretch your legs away from your body, pulling the arms under your shoulders. Touch the floor with your chin and toes. Inhale deeply and slowly as you thrust your body upward. Hold the pose for 15-30 seconds and then slowly exhale and go back down. Rest for 15 seconds and repeat for 5 times with breaks.
-
Chair (Uthkatasana)
This pose strengthens the spine, pulls in the abdominal muscles and supports the hips and thighs. Do not do this pose if you have a back or knee injury and avoid it if you suffer from chronic diseases or insomnia.

Directions:
Stand straight with your hands in Namaste position. Bend the knees as if you are seating in a chair and raise the hands above the head. Bend the torso inward as you are going deeper in the position. Breath normally and hold the position as much as you can.
-
Warrior 1 (Veerbhadrasana 1)
This is a natural pose that stretches your back and strengthens your core, buttocks and thighs. It is a calming position, it reduces belly fat and promotes peace and clarity.

Directions:
Start in a standing position, having your feet brought together and hands to the side. Extend the right leg forward and your left backward. Turn your midsection a bit, to face the bent right knee. Turn your left leg a bit to give your body additional support. Stay for 15-30 seconds in this position and breathe normally. Get slowly out of the pose while exhaling and straightening the right knee. Gently come back to the starting position. Repeat for the other leg.
-
Bridge (Setubandhasana)
This pose offers numerous benefits, including relief for the stiff muscles. It strengthens the spine and hips and it stretches the abs.it helps with high blood pressure, improves digestions and makes the menopause symptoms milder.
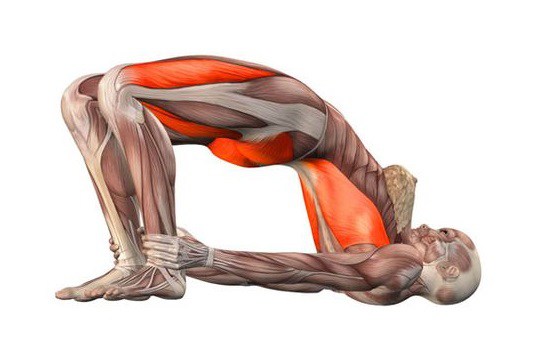
Directions:
Lay on your back and breathe out as you push off the floor with the help of the feet. Raise your body with your buttocks and back off the floor, but the neck down on the floor. Keep your hands on the ground for added support.
-
Warrior 2 (Veerbhadrasana 2)
This pose has similar effects as Warrior 1 and its best when done together.
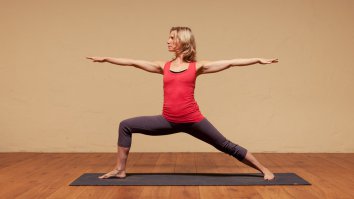
Directions:
Do the same steps of warrior 1, but instead of raising the hands above the head, stretch them away from the torso. Turn your hand to face the right leg. Repeat for the other leg.